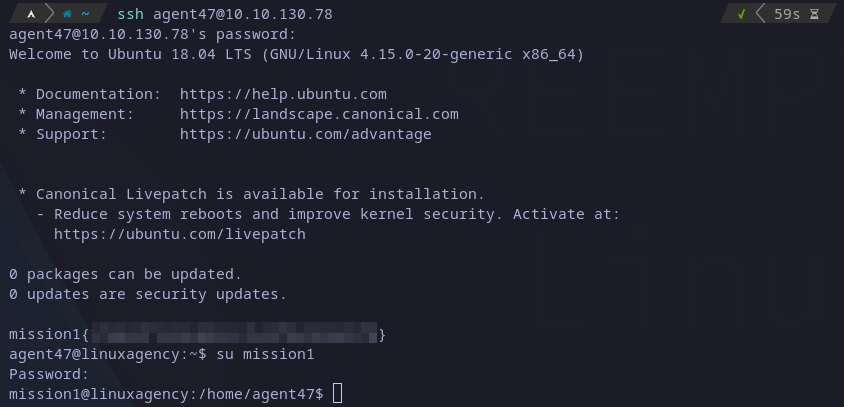
In this writeup I’ll explain the process to get the 30 flags from first section in Linux Agency room from TryHackMe. It will be as simple as possible but well explained. For this room just basic Linux knowledge is required.
The first think we have to do is to start the machine and log in via SSH with the given user and password (agent47:640509040147).
Mission 1
This is the easiest one, once we connect via SSH to the machine, in the MOTD (message of the day) we can see the flag:
 mission1 flag
We have to remember that we have to do horizontal privilege escalation and change from one user to another once we have to flag. To do so we just have to use su command as follows:
su <username>
And then just provide the flag as password.
Mission 2
Once we are in mission1 account we should change to current user home with cd command.
Listing the files (ls) in current directory will show next flag.
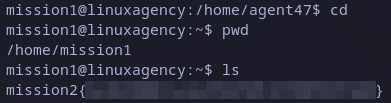 mission2 flag
Mission 3
Similar to last one, once we list files from current user’s home directory we see a file. We can read its contents with cat command:
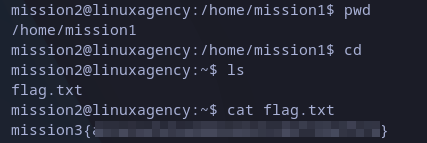 mission3 flag
Mission 4
Once again, we found a file. Unfortunately, this time it doesn’t show the message. To read for hidden characters, we can use strings command, and here we have:
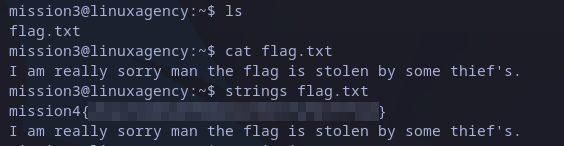 mission4 flag
Mission 5
Now, when listing files we just see a folder. We can still list files from that folder and the interesting file is inside.
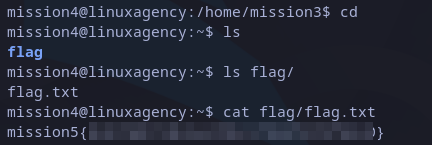 mission5 flag
Mission 6
In the first listing attempt, seems like there are not files in the directory. When listing for hidden files (ls -a) we found it:
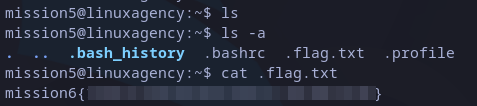 mission6 flag
Mission 7
Similar to last one, this time the hidden file is a folder, we can look for any file inside:
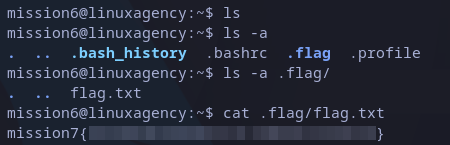 mission7 flag
Mission 8
Since we change to mission7 user there is a suspicious “Permission denied” message. The first attempts to run commands were not successful. Changing to current user’s home folder specifying the path (cd /home/mission7 or cd ../mission7) should solve the issue.
Once there we can find the flag and read it as usual:
 mission8 flag
Mission 9
You could try all techniques showed before, but seems there are not file this time. Well, we can try to search for it in all the system.
To do it we can use find command. It is followed for a few parameters: “/” is the route will start the search from, this is recursive and I want to start from Linux root directory; next we specify “-user“, as the parameter itself says is the owner of the file we are looking for and we know it is “mission8” user.
Following part of the command is not needed but the output is cleaner. we can see that the file is in the root of the file system, from there we can just read it as usual:
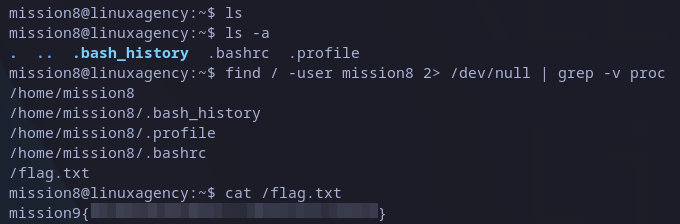 mission9 flag
Mission 10
This time we have a well-know dictionary which have more than 14 million words, you can realize of it if you try to read the file. In screenshot below you can see the total amount after wc command (this command is not needed to know).
Knowing this, it would be too difficult to find nest flag in the file by hand. To filter the file we can use grep, which uses regular expressions to search for strings in files. It has two required arguments: string to search and the file path. Running the command with “mission10” as string to search will reduce the count to just a few:
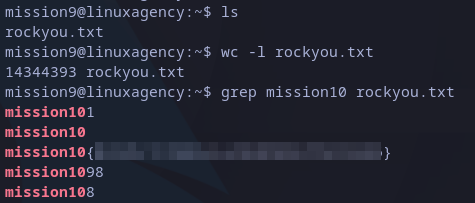 mission10 flag
Mission 11
Listing the files in home directory we have a folder called “folder” which seems to have many folder inside. Again used wc and find command and it would be very tedious to find any interesting file inside.
For mission9 flag we saw “-user” parameter, but find command has a lot. We can also filter by file type, you can search for details on command help. Seems to be a good idea to filter for files which will be “-type f“, and we got just one match:
 mission11 flag
Mission 12
Again, you can waster your time looking for a file in current user’s home and even in the whole file system and there is not interesting file. In this case is enough to take a look on environment variables with env command:
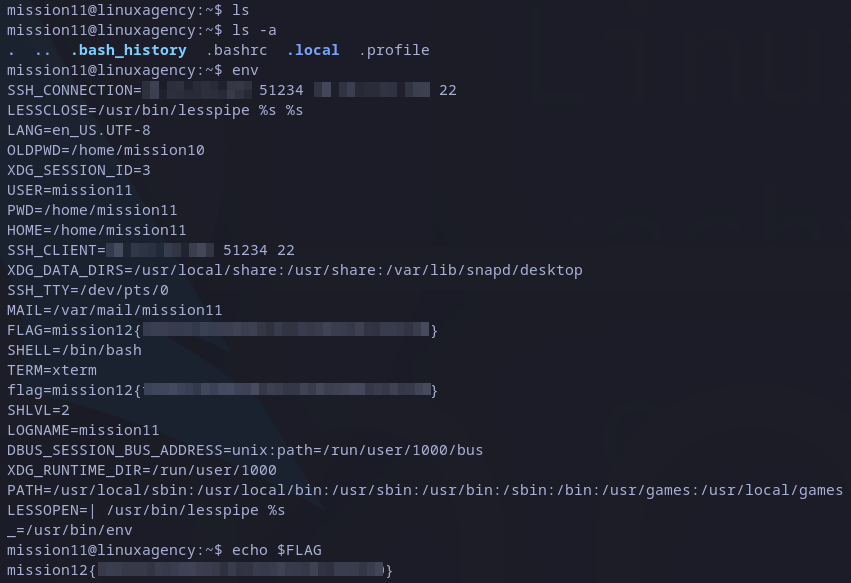 mission12 flag
Mission 13
Listing files seems to be an easy one. Trying to read the file will show “Permissions denied”. We can search permission details with ls -l, and we can see the file is not readable by anyone (we just see 10 “-” at the beginning). The are good news, current user (mission12) is owner of the file, so we can change permissions. To add read permissions to anyone we can use:
chmod +r flag.txt
We can try to read the file again:
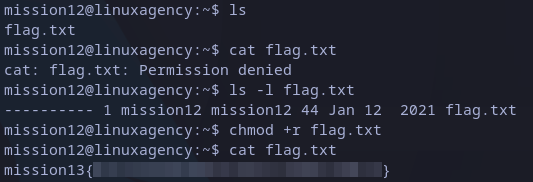 mission13 flag
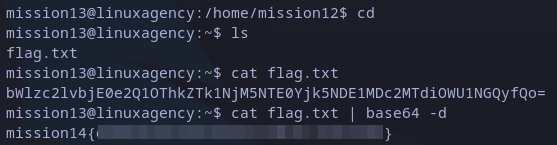
Mission 14
This time there are not permission issues but the string is not human-readable. This is encoding format known as base64. In Linux we can just pipe(“|”) the output from cat to “base64 -d” command and it will be decoded:
 mission14 flag
Mission 15
This is a good one. Text is binary encoded, which means that every 8 characters (0 or 1) represent a “real” character.
 Binary string
To decode the string you can use an online tool, but I prefer to do it in Linux CLI itself, so I wrote a python script to automate the process:
#!/usr/bin/python3

b = "*** REDACTED ***"
flag = ''

for i in range(0, len(b)-1, 8):
    flag += chr(int(b[i:i+8], 2))

print(flag)
Once variable b has the binary string value and running the script we get the flag:
 python: mission15 flag
I searched for a simple solution and found this post which shows that perl can do it with a simple command:
cat flag.txt | perl -lpe '$_=pack"B*",$_'
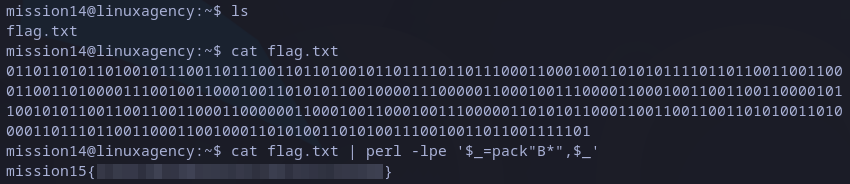 perl: mission15 flag
Mission 16
Similar to last one, this is hexadecimal string encoded. To get text plain text is simpler, we can use xxd command. I am using two parameters: -r to decode from hexadecimal to decimal and -p to show in plain text:
 mission16 flag
Mission 17
For this flag we have a file without extension. In Linux extensions are not required as OS knows file type checking file headers. we can do it with file command, and seems like we have an executable file as we see it is “ELF” file.
It has just reading permission, so we can allow execution as follows:
chmod +x flag
Then, executing the file shows the next flag:
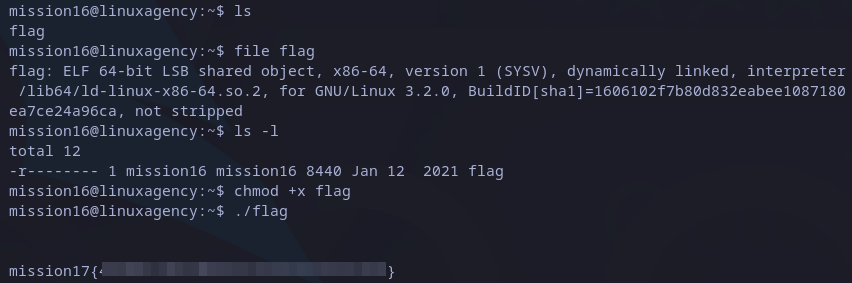 mission17 flag
Mission 18
This file is Java source code, you inspect it manually to see its contents, but I think it’s a good idea to compile and execute it, to do so we run:
javac flag.java
java flag
 mission18 flag
It could also work just execute: java flag.java.
Mission 19
Similar to last one, we now have ruby source code. You can execute it with:
ruby flag.rb
 mission19 flag
Mission 20
One more! Now we have C source code. To compile we can use gcc, then just need to execute as usual:
gcc flag.c -o flag
./flag
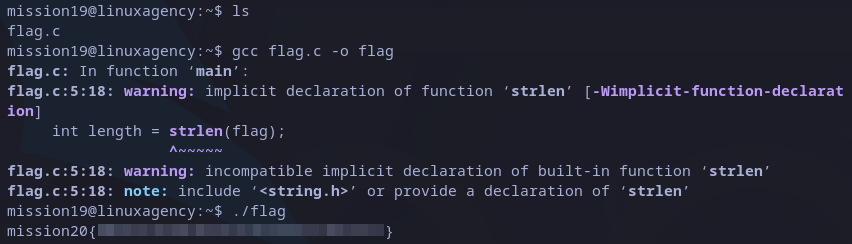 mission20 flag
Mission 21
More source code! This time we need python, this is easy:
python flag.py
 mission21 flag
Mission 22
Usually, when we change to another user we get the same prompt: “user@hostname:~$”. This time we just have “$”, and seems like we can execute commands. Anyways we can try to get the same prompt, so bash command should do the work:
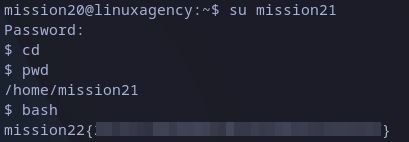 mission22 flag
Mission 23
As we can see, this time we are inside a python cli. Fortunately, there is a way to get a full bash shell from here, for that we just have to import pty (python pseudo-terminal utilities) and the spawn a bash shell:
import pty
pty.spawn("/bin/bash")
Now we have a bash cli, we can run commands as usual:
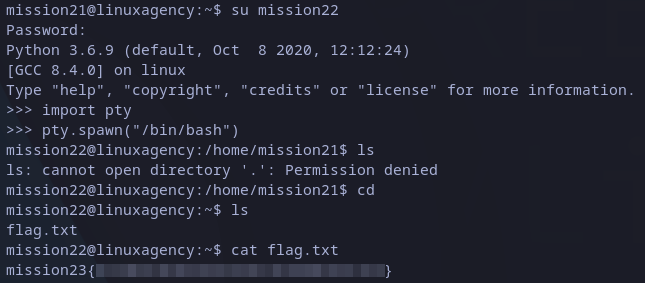 mission23 flag
Mission 24
We have a message instead of a flag, let’s see what we have: “The hosts will help you.”. We can try reading the hosts file (/etc/hosts), and see any virtual host in it.
Indeed there is an interesting domain name: “mission24.com”. As we are in a Linux cli we can’t open a browser and navigate to it. The alternative is curl, which can request any site from command line interface. So let’s try it:
curl mission24.com
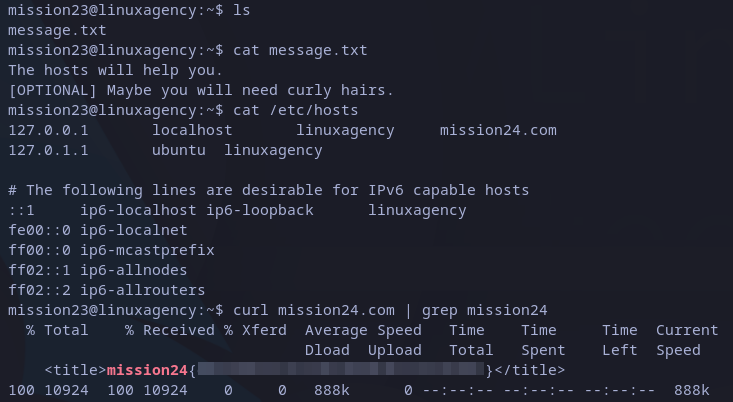 mission24 flag
Usage of grep is not needed but it’s easier to find the flag as we will see a lot of HTML source code.
Mission 25
As we can see in image below, we are given with an executable file, which when ran just shows a message which asks us for money, but there is not any kind of input to do it.
We can check for the flow of the executable with ltrace Linux command, and we realize there are two getenv(” interesting commands at the beginning:
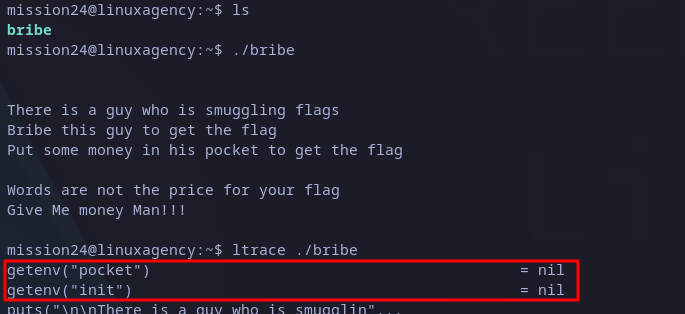 Checking executable flow
This can just mean, the program is trying to read “pocket” and “init” variables from environment. We can set any variable with export followed by the name of the variable to define and its value. In this case, I set “pocket” to “qwerty” which is a easy identifiable string:
 Testing setting environment variable
We can see something new, the program tries to compare (with”strncmp()) the read value and the word “money”. So we just need to reset the variable to the found value and trying to execute once again the executable we got it:
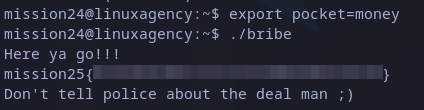 mission25 flag
Mission 26
Once changed to mission25 user, seems like there is not allowed commands. Just cd and pwd worked. A fun fact about these is that they don’t need an executable as they are shell builtin.
This could mean there is something wrong with the PATH variable and executables cannot be found. We can then call the utilities by its full path, for example:
/bin/ls
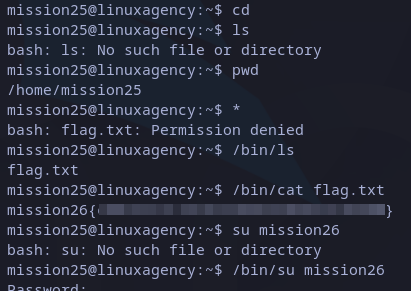 mission26 flag
Checking $PATH variable, we see it’s empty.
 Checking PATH varible
Besides call utilities by its full path we can also add folders to PATH instead, for example, adding following ones:
export PATH=/bin:/usr/bin
Mission 27
Now, we have a jpg file, but we don’t have an image viewer. We can see if there is any interesting string with strings command. I just used grep command to filter the output as it’s too long, but we got it:
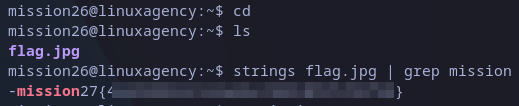 mission27 flag
Mission 28
Found file looks too weird, it has many different extensions. I would suspect if the last one is the right one. Checking with file command, this is indeed a gzip file. An utility with the same name can be used it to decompress it:
gzip -d <file>
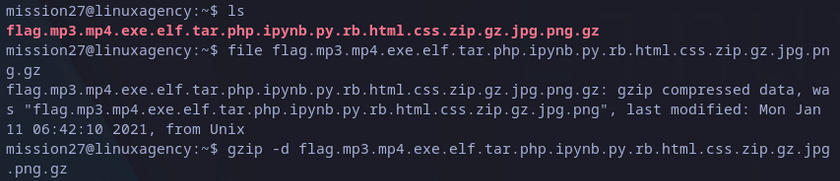 Decompress gzip
We have just removed one extension. At this point I want to check again if the file is indeed a png file as the last extension says, a png cannot be decoded or decompressed. It’s indeed an image file.
The best idea is to check for interesting text with strings, and we did it:
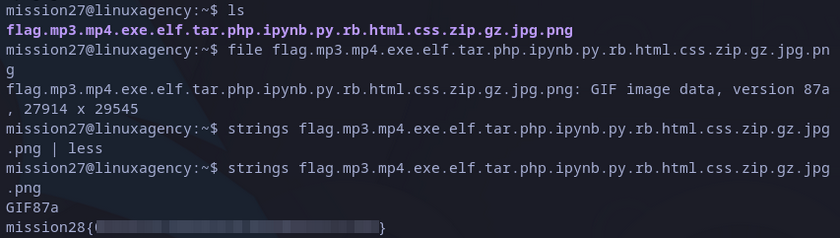 mission28 flag
Mission 29
Again a different command line interface. This time irb seems related to ruby. Searching in GTFOBins, we can find how to get a bash shell:
exec '/bin/bash'
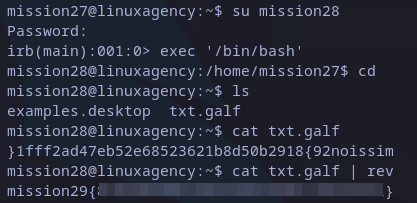 mission29 flag
Mission 30
As checked, bludit is an opensource CMS.
At this point, there are not many options besides searching in the folder looking for anything interesting. Fortunately, just looking in bludit root folder there is an interesting one: “.htpasswd”. Checking it, its content is what we are looking for:
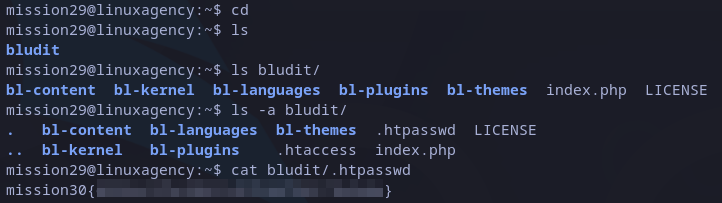 mission30 flag
This was the last one of this first section. This is a great resource to get the foundations and tools needed for privilege escalation. If you have any question you can always leave a comment.
This is the first section of Linux Agency room. In the next one we will see more sophisticated techniques, you can check it here.